Latest Entries »

If the OS has a problem with the existing kernel you may boot the OS with another existing kernel.

To check which kernel is enabled now

[root@mt-oracle6 ~]# uname -r

4.1.12-61.1.28.el6uek.x86_64

To change the kernel we need to edit;

#vi /etc/grub.conf

You will then see this configuration file


# grub.conf generated by anaconda

#

# Note that you do not have to rerun grub after making changes to this file

# NOTICE:  You have a /boot partition.  This means that

#          all kernel and initrd paths are relative to /boot/, eg.

#          root (hd0,0)

#          kernel /vmlinuz-version ro root=/dev/mapper/VolGroup-lv_root

#          initrd /initrd-[generic-]version.img

#boot=/dev/sda

default=0

timeout=5

splashimage=(hd0,0)/grub/splash.xpm.gz

hiddenmenu

title Oracle Linux Server Unbreakable Enterprise Kernel (4.1.12-124.36.4.el6uek.x86_64)  –>0

root (hd0,0)

kernel /vmlinuz-4.1.12-124.36.4.el6uek.x86_64 ro root=/dev/mapper/VolGroup-lv_root rd_NO_LUKS  KEYBOARDTYPE=pc KEYTABLE=uk LANG=en_US.UTF-8 rd_NO_MD rd_LVM_LV=VolGroup/lv_swap SYSFONT=latarcyrheb-sun16 crashkernel=auto rd_LVM_LV=VolGroup/lv_root rd_NO_DM rhgb quiet

initrd /initramfs-4.1.12-124.36.4.el6uek.x86_64.img

title Oracle Linux Server Red Hat Compatible Kernel (2.6.32-754.27.1.el6.x86_64)  —>1

root (hd0,0)

kernel /vmlinuz-2.6.32-754.27.1.el6.x86_64 ro root=/dev/mapper/VolGroup-lv_root rd_NO_LUKS  KEYBOARDTYPE=pc KEYTABLE=uk LANG=en_US.UTF-8 rd_NO_MD rd_LVM_LV=VolGroup/lv_swap SYSFONT=latarcyrheb-sun16 crashkernel=auto rd_LVM_LV=VolGroup/lv_root rd_NO_DM rhgb quiet

initrd /initramfs-2.6.32-754.27.1.el6.x86_64.img

title Oracle Linux Server Unbreakable Enterprise Kernel (4.1.12-61.1.28.el6uek.x86_64)   —>2

root (hd0,0)

kernel /vmlinuz-4.1.12-61.1.28.el6uek.x86_64 ro root=/dev/mapper/VolGroup-lv_root rd_NO_LUKS  KEYBOARDTYPE=pc KEYTABLE=uk LANG=en_US.UTF-8 rd_NO_MD rd_LVM_LV=VolGroup/lv_swap SYSFONT=latarcyrheb-sun16 crashkernel=auto rd_LVM_LV=VolGroup/lv_root rd_NO_DM rhgb quiet

initrd /initramfs-4.1.12-61.1.28.el6uek.x86_64.img

title Oracle Linux Server Red Hat Compatible Kernel (2.6.32-696.el6.x86_64)  —>3

root (hd0,0)

kernel /vmlinuz-2.6.32-696.el6.x86_64 ro root=/dev/mapper/VolGroup-lv_root rd_NO_LUKS  KEYBOARDTYPE=pc KEYTABLE=uk LANG=en_US.UTF-8 rd_NO_MD rd_LVM_LV=VolGroup/lv_swap SYSFONT=latarcyrheb-sun16 crashkernel=auto rd_LVM_LV=VolGroup/lv_root rd_NO_DM rhgb quiet

initrd /initramfs-2.6.32-696.el6.x86_64.img


The green highlighted lines are the kernels which installed before


We have 4 kernels in total with this VM, If you could change default value as 2 and reboot the OS that kernel will be enabled.

To change it press “i” go to line and change value as 2

To save the file

“:wq”

You need to reboot the VM to complete the task

Log Compress with 7Zip

Here is the quick script to compress *.log file with 7zip.


You may want to change PATH and DAYS (which is 45 here) and create schedule task for it.

@echo off
setlocal EnableExtensions DisableDelayedExpansion

rem // Define constants here:
set “_ROOT=C:\Path\W3SVC1”
set “_PATTERN=*.log”
set “_LIST=%TEMP%\%~n0.tmp”
set “_ARCHIVER=%ProgramFiles%\7-Zip\7z.exe”

rem // Get current date in locale-independent format:
for /F “tokens=2 delims==” %%D in (‘wmic OS get LocalDateTime /VALUE’) do set “TDATE=%%D”
set “TDATE=%TDATE:~,8%”

rem // Create a list file containing all files to move to the archive:
> “%_LIST%” (
for /F “delims=” %%F in (‘
forfiles /S /P “%_ROOT%” /M “%_PATTERN%” /D -45 /C “cmd /C echo @path”
‘) do echo(%%~F
) && (
rem // Archive all listed files at once and delete the processed files finally:
“%_ARCHIVER%” a -sdel “%_ROOT%_%TDATE%.zip” @”%_LIST%”
rem // Delete the list file:
del “%_LIST%”
)

endlocal
exit /B

To make history timestamps permanent for the current user;

$ echo ‘export HISTTIMEFORMAT=”%F %T “‘ >> ~/.bashrc
$ source ~/.bashrc


Hi,

Check this out if you have network issues after rebooting the server

Cd /etc/udev/rules.d

Check 70-persistent-net.rules

Clear unlisted PCI devices like eth1,eth2

Check MAC address of existing NIC

Reboot server

Edit /etc/sysconfig/network-scripts/ifcfg-eth0

IP,GW,DNS

Service network restart

Hi,

Quick steps to add additional NIC’s to VM Linux box:

  • Add NIC to VM
  • cd /etc/sysconfig/network-scripts/
  • cp ifcfg-eth0 ifcfg-eth1
  • Clear HWADDR
  • service network restart
  • AND second Interface will be UP and running


Kali Second Interface

Hi All,

If you have problem like me  to add second interface to your Kali Linux here’s the weird fix.

Delete the ‘Wired Connection 1’ file

Kali1

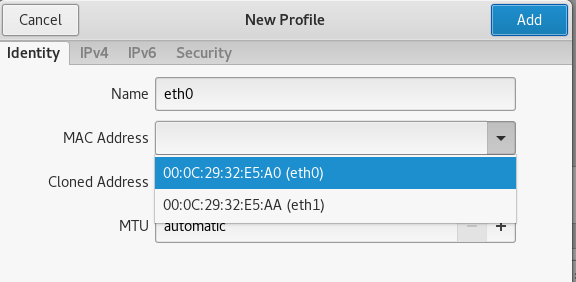
Then add the interfaces again.Be careful to choose the right MAC address for the NIC.

Kali2

And the result;


Hope it helps…


Ref:https://forums.kali.org/showthread.php?29657-Only-one-of-multiple-wired-interfaces-(eth0-eth1-etc)-can-be-active-at-a-time  #5


Merhaba,

Microsoft Update’i yapıp sistemin durması sıklıkla karşılaşılan durumlardan.SQL 2008 R2 SP1 —> SP3 geçisi sonrasında


“2017-11-15 15:08:48.52 Logon Error: 18401, Severity: 14, State: 1.
2017-11-15 15:08:48.52 Logon Login failed for user ‘user’. Reason: Server is in script upgrade mode. Only administrator can connect at this time. [CLIENT: <local machine>]”


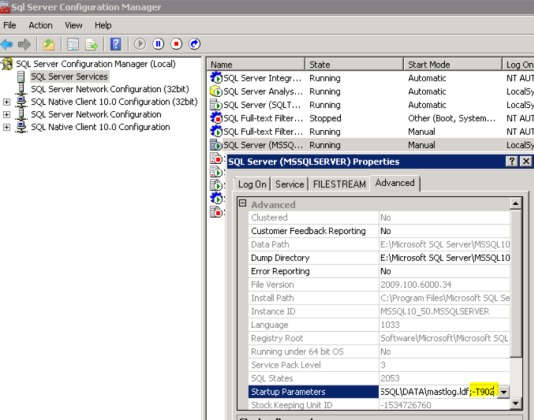
şeklinde hatadan sonra  SQL startup parametresine ;-T902 eklememiz instance’a olan bağlantıyı sağlıyor.(SQL Servisi tabiki stop,start yapıyoruz)

SQL1


Daha sonra şu sorguyu  çalıştırmamız gerekiyor

EXEC sp_configure ‘show advanced’, 1;
RECONFIGURE;
EXEC sp_configure ‘allow updates’, 0;
RECONFIGURE;
EXEC sp_configure ‘Agent XPs’, 1;
RECONFIGURE;
GO


Bu işlemden sonra servise verdiğimiz parametreyi kaldırıp giriş yapmayı denediğimizde herşey yerinde geliyor,gelmeli 🙂


Ref:https://support.microsoft.com/en-us/help/2163980/fix-the-sql-server-service-cannot-start-after-you-install-cumulative-u


Wireshark Scheduled Task

Merhaba,

İstenilen makinada schedule task olarak dumpcap ile pcap dosyaları yaratma adımları.

İşlem yapılacak makinada ProgramFiles\Wireshark\dumcap -D ile network interface bilgileri listenerek seçim yapılır.

-a parametresi task’ın toplam çalışacağı süre

-b parametresi hangi aralıklarla dosya oluşacağı düzenlenir.

@echo.
start “dumpcap” “C:\Program Files\Wireshark\dumpcap.exe” -a duration:120 -b duration:100 -i \Device\NPF_{C622602E-31A4-4989-B15C-CCE2E935C764} -w F:\Wireshark\capture.pcap
EXIT
@TITLE DUMPCAP stopped
@pause


İşinize yaraması dileğiyle


Merhaba,

Dış dünyadan gelen istenmeyen ip adreslerinin manual olarak bloklanabilmesi için gerekli komutlar

edit policy-options prefix-list block-manual
set 1.1.1.1/32
up
annotate prefix-list block-manual “Manual Block List”
up
set firewall family inet filter blocked-IP term 1 from prefix-list block-manual
set firewall family inet filter blocked-IP term 1 then discard
set firewall family inet filter blocked-IP term 99 then accept
set interfaces ge-0/0/1.111 family inet filter input blocked-IP


Yararlı olması umuduyla…


Merhaba,


Birkaç adımda ESXi ortamımızı ESXi 5.5 sürümüne internet üzerinden yükseltmek için izlenecek adımlar;


  • VM ortamını maintenance mode’ a alıyoruz.
  • SSH ve ESXi Shell’i aktif hale getiriyoruz
  • ESXi host’un internet erişimi olması gerekiyor.Doğal olarak J
  • Http Client’ın ESXi firewall (outbound) aktif olması gerekiyor.İlgili komut

    esxcli network firewall ruleset set -e true -r httpClient


  • Refresh ederek kuralın çalışmasını sağlıyoruz.

    esxcli network firewall refresh


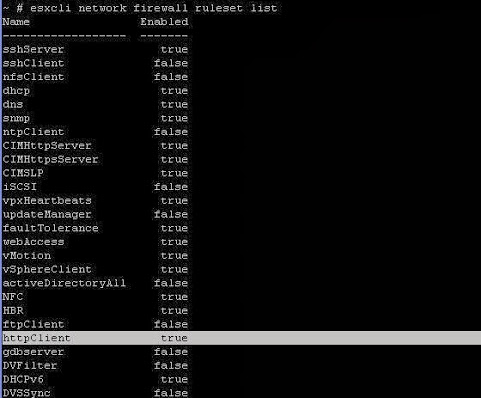
  • http Client’ın Firewall’da devrede olduğunun teyidi için çalıştırabileceğimiz komut;

    esxcli network firewall ruleset list


  • Upgrade işlemini sağlayacak olan komutta şu şekildedir;

    esxcli software profile update -d https://hostupdate.vmware.com/software/VUM/PRODUCTION/main/vmw-depot-index.xml -p ESXi-5.5.0-1331820-standard


  • Update işlemi bittikten sonra host’u reboot etmemiz gerekecektir.


    Yararlı olması umuduyla J